
Highlights:
- A car air filter is a small but essential engine component that keeps dust, dirt, and debris from entering the engine and directly impacts performance, fuel efficiency, and long-term engine health.
- Learning how to change car air filter is a quick and beginner-friendly DIY maintenance task that typically takes under 15 minutes and requires minimal tools, making it accessible to almost any car owner.
- A clogged or dirty air filter can significantly reduce engine power, increase fuel consumption, cause rough idling, and in severe cases lead to black exhaust smoke and long-term engine strain.
- Most car air filters should be replaced every 12,000–15,000 miles (or about once a year), though driving conditions like dust, traffic, or off-road use may require more frequent changes.
- Changing a car air filter involves simple steps: locating the airbox, opening it, removing the old filter, cleaning the housing, inserting a new filter correctly, and securely closing the unit.
- Choosing the right air filter type (paper, foam, or cotton gauze) depends on driving conditions, budget, and maintenance preference, with OEM paper filters being the most common and practical choice.
A car air filter is one of those small components that quietly does a big job. It keeps dust, dirt, debris, and other contaminants from entering your engine. When it gets clogged, your car doesn’t breathe properly, and that can lead to reduced performance, worse fuel economy, and even long-term engine wear.
The good news is that learning how to change car air filter is one of the easiest DIY maintenance tasks you can do at home. You don’t need advanced tools or mechanical experience, and in most cases, it takes less than 15 minutes.
In this guide, you’ll learn everything you need to know—from what a car air filter does, how to know when it needs replacing, and a step-by-step breakdown of how to change it properly.
What Is a Car Air Filter and Why Does It Matter?
Your engine needs a mix of air and fuel to run efficiently. The air filter is responsible for cleaning the air before it enters the combustion chamber.
Think of it like your car’s lungs. If those lungs get clogged, everything else has to work harder.
A clean air filter helps:
- Improve engine performance
- Maintain better fuel efficiency
- Reduce harmful emissions
- Prevent dust and debris from damaging engine components
When it gets dirty, airflow is restricted. That forces your engine to work harder, which can reduce performance and increase fuel consumption.
How Does a Dirty Air Filter Affect Your Car?
Before learning how to change car air filter, it’s important to understand what happens when you ignore it. A dirty or clogged air filter doesn’t just slightly reduce performance—it gradually affects how efficiently your engine breathes, burns fuel, and responds to acceleration. Over time, this imbalance can create noticeable driving issues and even increase long-term maintenance costs.
A clogged filter can cause:
Reduced Engine Power
When the air filter becomes clogged with dust, dirt, and debris, it restricts the amount of air flowing into the engine. Since the engine relies on a precise air-fuel mixture to generate power, limited airflow disrupts combustion efficiency. You’ll often notice this as slower acceleration, especially when merging onto highways or driving uphill. The car may still run, but it feels heavier, less responsive, and less willing to “pick up speed” when you press the gas pedal.
Poor Fuel Economy
A restricted air supply forces the engine control unit (ECU) to adjust by injecting more fuel to compensate for the lack of oxygen. This imbalance leads to inefficient fuel combustion, meaning you burn more fuel just to achieve the same level of performance. Over time, even a moderately dirty air filter can cause a measurable drop in miles per gallon (or kilometers per liter), which becomes noticeable if you track fuel costs regularly.
Rough Idling
At idle, your engine should run smoothly and consistently with minimal vibration. However, when airflow is restricted, the air-fuel mixture becomes inconsistent, causing unstable combustion. This can result in shaking, fluctuating RPMs, or a “hunting” idle where the engine speed rises and falls slightly without input. In more severe cases, the engine may feel like it’s struggling to stay on, especially when the air conditioner is running or electrical loads are high.
Black Smoke or Unusual Exhaust
When the engine doesn’t receive enough air, fuel may not burn completely during combustion. This incomplete burning can lead to excess carbon buildup and, in some cases, visible black smoke from the exhaust. While this symptom is more common in heavily clogged filters or older vehicles, it’s a clear sign that the engine is running too “rich” (too much fuel, not enough air). You may also notice a stronger fuel smell from the exhaust or increased soot around the tailpipe.
Engine Strain Over Time
A dirty air filter forces the engine to work harder than normal just to maintain basic performance. Over time, this added strain can contribute to carbon buildup on internal components, reduced combustion efficiency, and increased wear on sensors like the mass airflow sensor. While it may not cause immediate failure, long-term neglect can shorten engine life and lead to more expensive repairs down the road.
If your car feels “off,” the air filter is one of the first things worth checking. Even subtle changes in acceleration, fuel usage, or idle smoothness can often be traced back to restricted airflow.
How Often Should You Change a Car Air Filter?
There’s no one-size-fits-all answer, but general guidelines include:
- Every 12,000 to 15,000 miles (or 20,000–25,000 km)
- Once a year for average drivers
- More frequently if you drive in dusty, polluted, or off-road conditions
You should also check it sooner if:
- You drive in heavy traffic often
- You live in a dusty or rural area
- Your car feels less responsive than usual
A quick inspection every oil change is a good habit.
What Tools Do You Need to Change a Car Air Filter?
One of the best things about learning how to change car air filter is how simple the tools are. In most cases, you’ll need nothing more than your hands.
Possible tools:
- New air filter (specific to your car model)
- Screwdriver (if the airbox is screwed shut)
- Clean cloth (optional, for wiping dust)
- Gloves (optional, to keep your hands clean)
That’s it. No lifts, no machines, no special equipment.
Where Is the Car Air Filter Located?
In most vehicles, the air filter is located inside a black plastic box called the air filter housing or airbox.
You’ll usually find it:
- Near the front or side of the engine bay
- Connected to a large intake hose
- In a rectangular or square-shaped casing
If you’re unsure, your car manual will show the exact location. Some modern vehicles make it very accessible, while others may require removing clips or screws.
How to Change Car Air Filter Step by Step
Now let’s get into the main process. This is the core of understanding how to change car air filter properly. While the steps are simple, doing them carefully ensures you don’t accidentally introduce dust into the engine or install the filter incorrectly, both of which can affect performance.
Step 1: Turn Off the Engine and Open the Hood
Start by parking your car on a flat, stable surface and turning the engine off completely. It’s important that the engine is cool because working around hot components like the engine block or intake system can lead to burns or discomfort.
Once the engine is off, engage the handbrake for safety, then release the hood latch inside the car. Go to the front, fully open the hood, and secure it using the support rod or hydraulic strut, depending on your vehicle. Before touching anything, take a moment to visually scan the engine bay so you know where the main components are located.
Step 2: Locate the Air Filter Housing
The air filter housing, often called the airbox, is usually a black plastic box connected to a thick rubber or plastic intake hose. This hose leads directly toward the engine, making it relatively easy to identify.
In most vehicles, the airbox is positioned near the top or side of the engine bay for easy access. Some modern cars may have covers or additional components around it, so you might need to move aside a few plastic covers or wiring clips to see it clearly. If you’re unsure, checking your vehicle manual or a quick model-specific diagram can save time.
Step 3: Open the Airbox
Once you’ve located the housing, you’ll need to open it carefully. Different manufacturers use different securing mechanisms, so this step can vary slightly depending on your car. Common setups include metal clips that snap open, plastic locking tabs that need to be released, or screws that require a basic screwdriver.
Take your time here and avoid forcing anything. If clips feel stiff, gently wiggle them rather than pulling hard, as older plastic parts can become brittle. Keep track of any screws you remove so they don’t get lost in the engine bay. The goal is to open the housing without cracking or damaging the sealing edges, since a tight seal is essential for proper airflow.
Step 4: Remove the Old Air Filter
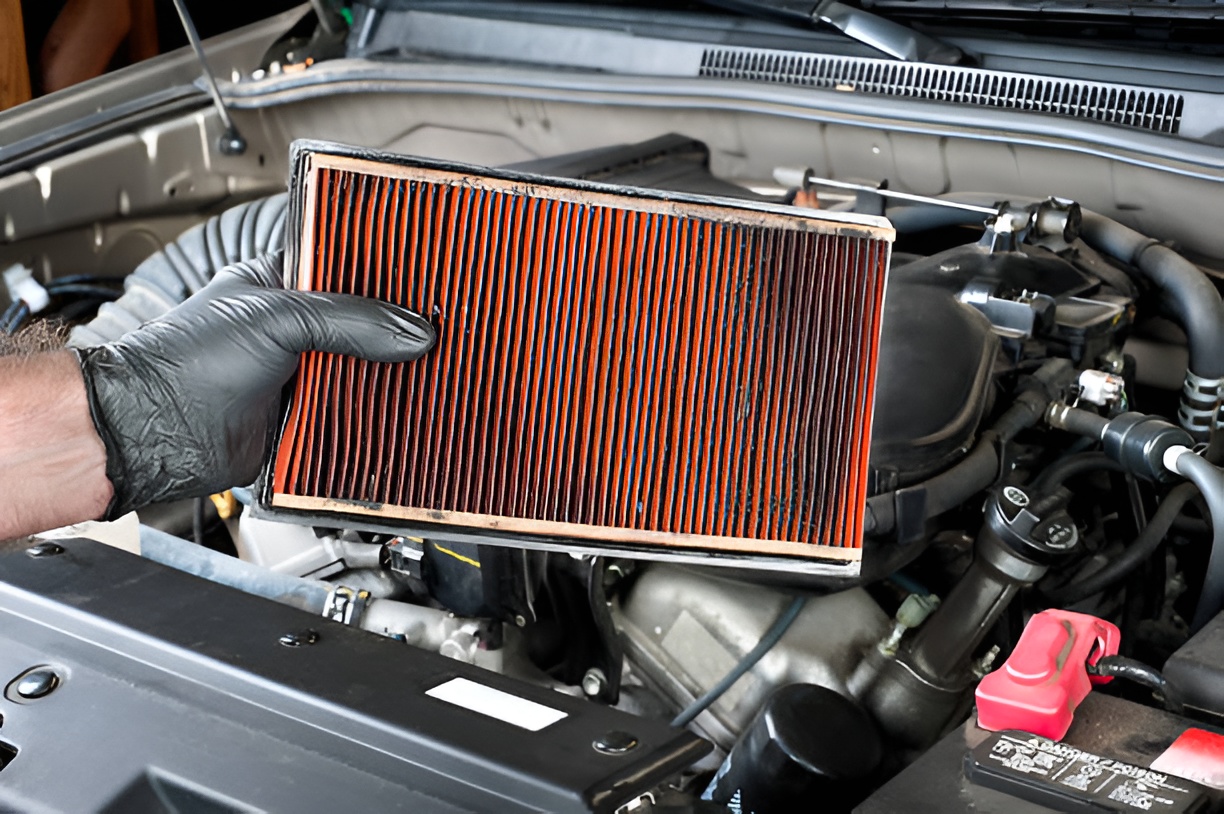
Once the airbox is open, you’ll see the air filter sitting inside a rectangular frame. Carefully lift it out, paying attention to how it is positioned. This is important because the new filter must be installed in the exact same orientation to ensure proper airflow direction.
As you remove it, take a closer look at its condition. A slightly grey or dusty filter is normal, but if it appears dark brown, clogged with debris, or warped, it has likely been overdue for replacement. Also check for:
- Heavy dirt buildup or sand-like particles
- Leaves, insects, or larger debris trapped in folds
- Oil residue or dampness, which could indicate engine or intake issues
If the filter is extremely dirty, avoid shaking it aggressively, as this can release dust into the airbox.
Step 5: Clean the Airbox (Optional but Recommended)
Before installing the new filter, it’s a good idea to clean the inside of the airbox. Use a dry or slightly damp clean cloth to wipe away dust, sand, or loose debris. Pay special attention to the corners where particles tend to collect. If you see debris near the intake tube opening, carefully remove it without pushing anything further inside.
Avoid using compressed air unless you are confident, as it can blow dirt deeper into the intake system. This step is optional, but it helps ensure your new filter starts in a clean environment, which improves its lifespan and effectiveness.
Step 6: Insert the New Air Filter
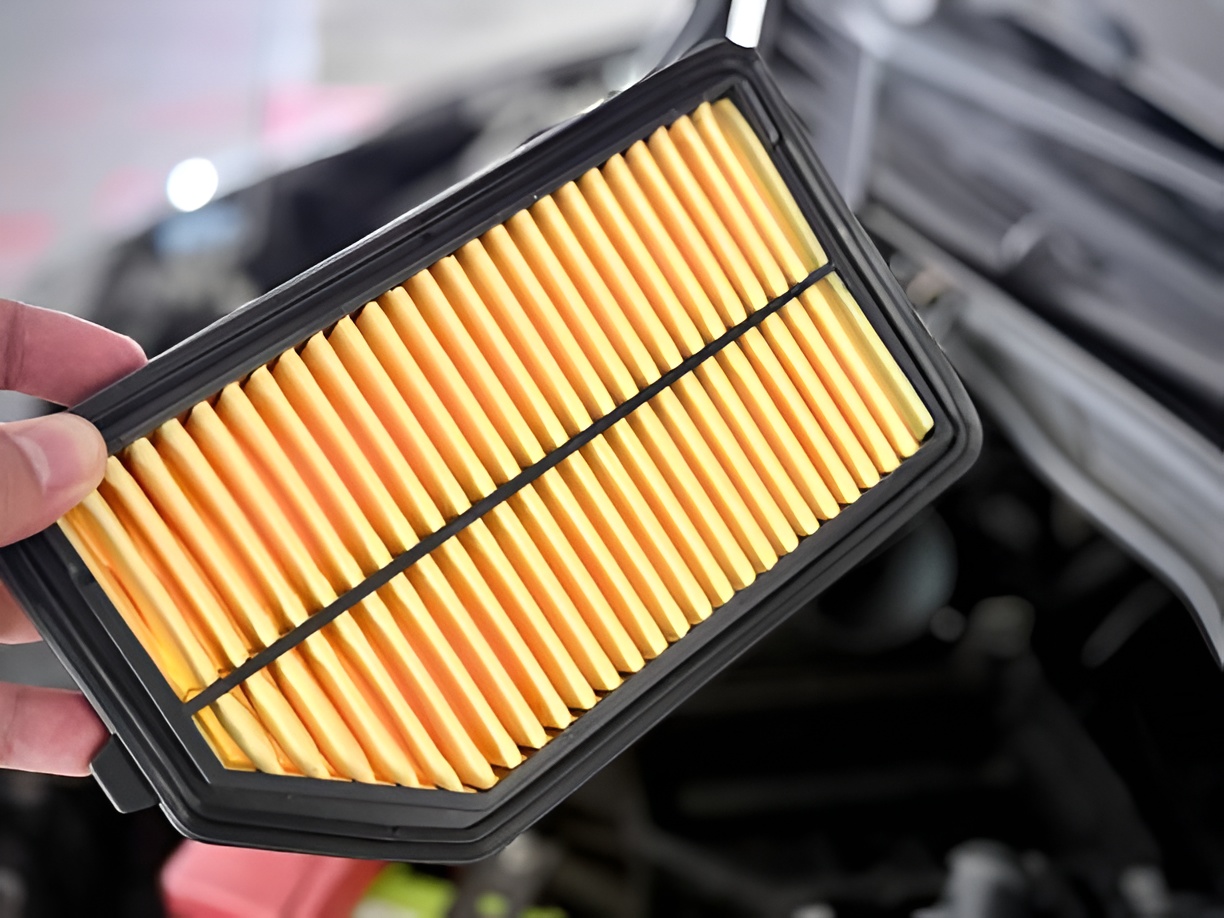
Take your new air filter and compare it with the old one to confirm it’s the correct size and shape. Place it into the airbox in the same orientation as the previous filter. Most filters are designed to fit only one way, but it’s still important to ensure the rubber edges sit evenly inside the housing.
Check around all sides of the filter to make sure there are no gaps or lifted edges. Even a small misalignment can allow unfiltered air to bypass the filter, which defeats its purpose and can let dust into the engine.
Step 7: Close and Secure the Airbox
Once the filter is properly seated, carefully close the airbox cover. Align it correctly before applying pressure or fastening anything. Reattach clips, screws, or locking tabs in the reverse order of how you opened them.
Make sure everything is firmly secured. A loose airbox can cause air leaks, whistling sounds, or inaccurate airflow readings, which may affect engine performance. Double-check that all clips are fully locked and that the cover sits flush with the base.
Step 8: Close the Hood and Test Your Car
After everything is secured, lower the hood and ensure it latches properly. Start the engine and let it idle for a minute. Listen for smooth, consistent operation without unusual sounds like hissing or rattling.
When you take the car for a short drive, you may notice subtle improvements such as smoother acceleration, slightly better throttle response, and more consistent engine behavior. While the change might not feel dramatic in every case, the engine is now breathing properly again, which supports long-term performance and efficiency.
What Type of Air Filter Should You Use?
Not all air filters are the same, and choosing the right one can affect performance, maintenance frequency, and even long-term engine cleanliness. The best option depends on your driving conditions, budget, and how often you want to replace or clean the filter.
Common types include:
Paper Filters (Most Common)
Paper air filters are the standard option for most vehicles and are typically what manufacturers install from the factory. They are made of layered fibrous material designed to trap fine dust and debris efficiently.
Key characteristics:
- Affordable and widely available
- Excellent filtration for everyday driving conditions
- Designed for single use and replacement, not cleaning
- Best suited for city driving and normal highway use
For most drivers, this is the most practical and reliable choice.
Foam Filters
Foam filters are more common in motorcycles, off-road vehicles, and some performance setups. They use a porous foam material that can be cleaned and reused.
Key characteristics:
- Better performance in dusty or off-road environments
- Can be washed, re-oiled, and reused multiple times
- Slightly higher maintenance effort
- May require regular cleaning to maintain efficiency
These are ideal if you frequently drive on unpaved roads or in heavy dust conditions.
Cotton Gauze Filters
Cotton gauze filters are often used in performance-oriented setups. They are designed to increase airflow while still providing filtration through layered cotton material.
Key characteristics:
- Higher airflow compared to standard paper filters
- Reusable with proper cleaning kits
- More expensive upfront cost
- Can improve engine responsiveness in some vehicles
However, they require proper maintenance. If not cleaned correctly, they may lose efficiency or allow fine particles through.
For most everyday drivers, a standard OEM-quality paper filter remains the safest and most cost-effective option.
Common Mistakes When Changing a Car Air Filter
Even though learning how to change car air filter is relatively simple, small mistakes can still reduce effectiveness or even allow dirt into the engine. Being aware of these errors helps ensure the job is done properly.
Installing the Filter Backward
One of the most common mistakes is inserting the filter in the wrong direction. Many filters have airflow arrows printed on the side, and ignoring this can reduce efficiency. A backward installation may restrict airflow or reduce the filter’s ability to trap particles properly.
Using the Wrong Filter Size
Even if a filter looks similar, small size differences matter. A filter that doesn’t fit tightly can leave small gaps where unfiltered air bypasses the filter entirely. This can allow dust and debris to enter the engine, leading to long-term wear.
Forgetting to Secure the Airbox
If the airbox is not properly sealed after replacement, it can create air leaks. These leaks may cause:
- Whistling or hissing sounds
- Inconsistent airflow readings
- Reduced engine performance
Always ensure clips and screws are fully tightened and the housing is completely sealed.
Ignoring the Intake Hose Condition
While changing the filter, it’s easy to overlook the intake hose connected to the airbox. However, cracks, loose clamps, or worn rubber can allow unfiltered air to enter the system. This reduces the effectiveness of even a brand-new filter.
Skipping Cleaning the Housing
Installing a new filter into a dirty airbox is a missed opportunity. Old dust, sand, or debris inside the housing can quickly contaminate the new filter. Over time, this reduces its lifespan and performance. A quick wipe-down ensures the new filter starts in a clean environment and performs as intended.
Signs You Need to Replace Your Air Filter Immediately
Sometimes you shouldn’t wait for scheduled maintenance. Look out for:
- Noticeable drop in acceleration
- Increased fuel consumption
- Engine sounds rough or strained
- Visible dirt when inspecting the filter
- Check engine light (in some cases)
If you notice multiple symptoms, it’s time to act.
Can You Clean a Car Air Filter Instead of Replacing It?
It depends on the type.
- Paper filters: not designed to be cleaned, should be replaced
- Reusable foam or cotton filters: can be cleaned and reused
If you’re unsure, replacement is usually the safest and most reliable option.
How Long Does It Take to Change a Car Air Filter?
For most cars, it takes:
- 5 to 15 minutes for beginners
- Even less once you’ve done it before
It’s one of the fastest maintenance tasks you can learn, which makes it a great starting point for DIY car care.
Why Learning How to Change Car Air Filter Saves You Money
Mechanics often charge for labor that you can easily avoid. Doing it yourself:
- Eliminates service fees
- Extends engine life
- Improves fuel efficiency
- Reduces unnecessary workshop visits
Over time, this small skill can save you a noticeable amount of money.
How to Make Air Filter Checks a Habit
Most drivers forget about air filters until problems appear. A better approach is routine checking.
Try this:
- Check every oil change
- Inspect during seasonal maintenance
- Replace once a year or as needed
- Keep a spare filter at home for convenience
Consistency matters more than complexity.
Frequently Asked Questions
Is changing a car air filter really necessary?
Yes. It directly affects engine performance, fuel efficiency, and long-term engine health.
Can I drive with a dirty air filter?
You can, but it’s not recommended. It reduces performance and may increase fuel consumption.
Will changing the air filter improve acceleration?
In many cases, yes. A clean filter allows better airflow, which improves engine response.
Do all cars have the same air filter?
No. Each car model requires a specific filter size and shape.
What happens if I don’t change it for years?
Severe clogging can lead to poor performance, higher fuel costs, and potential engine strain.
Final Thoughts
Learning how to change car air filter is one of the simplest yet most impactful car maintenance skills you can have. It doesn’t require special tools, it doesn’t take much time, and it directly improves how your car performs.
If you make it part of your regular maintenance routine, you’ll keep your engine healthier, your fuel costs lower, and your driving experience smoother overall.
The best part is that once you do it once, you’ll probably never feel the need to pay someone else to do it again.